

Guide
Dec 11, 2023
Create Your Own Custom User Menu with Radix


Roy Anger
Quickly and easily build a custom user menu for your application leveraging Clerk's hooks and methods and building on Radix primitives for a custom UI.
Clerk’s components were created with you in mind. Components do most of the functional work for you, allowing you to get your auth flows working in minutes, and support customization to fit your app’s style. That said, sometimes a component like the <UserButton /> doesn’t suit the needs of your application. The good news? Clerk provides hooks and functions that make building your custom UI components easy. Let’s take a quick look at how to create your custom user menu.
Code samples are from @clerk/nextjs 4.27.2 and @radix-ui/react-dropdown-menu 2.0.6
Getting Started
The hardest part of building a custom user menu is often the dropdown menu itself. You need the button to trigger the menu opening, a way to close it, a way to track open/closed states, a way to handle ‘click off’ to close, logic to close if the user hits the Esc button, a way to handle keyboard input, and the list goes on. We’re going to save ourselves some time and use a great library while doing so. Radix provides world-class, accessible, unstyled primitives that you can use to quickly and efficiently build your UI. Let’s start by installing the primitive we need — the dropdown menu.
1pnpm install @radix-ui/react-dropdown-menu
Once the installation finishes, let’s create the scaffolding for our new component. The following will be the foundation of the menu. The trigger will hold the User button that will open the menu, and each item will hold one of the menu entries. Remember that Radix Primitives are unstyled and there is no content so this will be blank.
1"use client";23import * as DropdownMenu from "@radix-ui/react-dropdown-menu";45export const UserButton = () => {6return (7<DropdownMenu.Root>8<DropdownMenu.Trigger></DropdownMenu.Trigger>9<DropdownMenu.Portal>10<DropdownMenu.Content>11<DropdownMenu.Label />12<DropdownMenu.Group>13<DropdownMenu.Item></DropdownMenu.Item>14<DropdownMenu.Item></DropdownMenu.Item>15</DropdownMenu.Group>16<DropdownMenu.Separator />17<DropdownMenu.Item></DropdownMenu.Item>18</DropdownMenu.Content>19</DropdownMenu.Portal>20</DropdownMenu.Root>21);22};
Create the User Button
The first content we will add is the User button. This will show that the user is logged in, and will be the trigger to open the menu. For the sake of this post we will assume that you have marked email as required in the Clerk Dashboard, in the User & Authentication → Email, Password, Username → Email section to ensure every user has an email. You could change this to a first name or username easily enough. Just make sure that whatever option you choose is something that will exist for all users, for the sake of rendering. You could also conditionally render different information depending on what the user has provided — show the first name if available; if not, show the email.
To build the button we will leverage the useUser() hook. This gives us access to information about the user, such as profile image, email, name, and more. We will also make sure that Clerk and the user have loaded, and that there is valid user data, before rendering the User button.
1"use client";23import * as DropdownMenu from "@radix-ui/react-dropdown-menu";4// Import useUser()5import { useUser } from "@clerk/nextjs";6// Import the Image element7import Image from "next/image";89export const UserButton = () => {10// Grab the `isLoaded` and `user` from useUser()11const { isLoaded, user } = useUser();1213// Make sure that the useUser() hook has loaded14if (!isLoaded) return null;15// Make sure there is valid user data16if (!user?.id) return null;1718return (19<DropdownMenu.Root>20<DropdownMenu.Trigger>21{/* Render a button using the image and email from `user` */}22<button>23<Image24alt={user?.primaryEmailAddress?.emailAddress!}25src={user?.imageUrl}26width={30}27height={30}28/>29{user?.username30? user.username31: user?.primaryEmailAddress?.emailAddress!}32</button>33</DropdownMenu.Trigger>34<DropdownMenu.Portal>35<DropdownMenu.Content>36<DropdownMenu.Label />37<DropdownMenu.Group>38<DropdownMenu.Item></DropdownMenu.Item>39<DropdownMenu.Item></DropdownMenu.Item>40</DropdownMenu.Group>41<DropdownMenu.Separator />42<DropdownMenu.Item></DropdownMenu.Item>43</DropdownMenu.Content>44</DropdownMenu.Portal>45</DropdownMenu.Root>46);47};
Add the Sign-Out and Manage Account Buttons
With the User button in place, we can now add Sign Out and Manage Account buttons. The useClerk() hook provides the two methods we will need for this — the signOut() method and the openUserProfile() method. The User Profile will open as a modal. You could, instead, mount the <UserProfile /> component to its own route, and then link it to the route. For the Sign Out button, we will also need to use the Next.js router to handle the redirect.
1"use client";23import * as DropdownMenu from "@radix-ui/react-dropdown-menu";4// Import useClerk()5import { useUser, useClerk } from "@clerk/nextjs";6// Import the Next.js router7import { useRouter } from "next/navigation";8import Image from "next/image";910export const UserButton = () => {11const { isLoaded, user } = useUser();12// Grab the signOut and openUserProfile methods13const { signOut, openUserProfile } = useClerk();14// Get access to the Next.js router15const router = useRouter();1617if (!isLoaded) return null;18if (!user?.id) return null;1920return (21<DropdownMenu.Root>22<DropdownMenu.Trigger>23<button>24<Image25alt={user?.primaryEmailAddress?.emailAddress!}26src={user?.imageUrl}27width={30}28height={30}29/>30{user?.username31? user.username32: user?.primaryEmailAddress?.emailAddress!}33</button>34</DropdownMenu.Trigger>35<DropdownMenu.Portal>36<DropdownMenu.Content>37<DropdownMenu.Label />38<DropdownMenu.Group>39<DropdownMenu.Item>40{/* Create a button with an onClick to open the User Profile modal */}41<button onClick={() => openUserProfile()}>Profile</button>42</DropdownMenu.Item>43<DropdownMenu.Item></DropdownMenu.Item>44</DropdownMenu.Group>45<DropdownMenu.Separator />46<DropdownMenu.Item>47{/* Create a Sign Out button -- signOut() takes a call back where the user is redirected */}48<button onClick={() => signOut(() => router.push("/"))}>49Sign Out{" "}50</button>51</DropdownMenu.Item>52</DropdownMenu.Content>53</DropdownMenu.Portal>54</DropdownMenu.Root>55);56};
Extending the Custom User Menu
The custom button has now replicated the behavior of the <UserButton />, though it is very much still unstyled. We’re going to do one more thing — add one more menu entry to mimic expanding the menu. This will use the <Link /> component from Next.js to link to a fictional /subscriptions route.
1"use client";23import * as DropdownMenu from "@radix-ui/react-dropdown-menu";4import { useUser, useClerk } from "@clerk/nextjs";5import { useRouter } from "next/navigation";6import Image from "next/image";7// Import Link to add more buttons to the menu8import Link from "next/link";910export const UserButton = () => {11const { isLoaded, user } = useUser();12const { signOut, openUserProfile } = useClerk();13const router = useRouter();1415if (!isLoaded) return null;16if (!user?.id) return null;1718return (19<DropdownMenu.Root>20<DropdownMenu.Trigger>21<button>22<Image23alt={user?.primaryEmailAddress?.emailAddress!}24src={user?.imageUrl}25width={30}26height={30}27/>28{user?.username29? user.username30: user?.primaryEmailAddress?.emailAddress!}31</button>32</DropdownMenu.Trigger>33<DropdownMenu.Portal>34<DropdownMenu.Content className="border border-gray-200 bg-white text-black drop-shadow-md">35<DropdownMenu.Label />36<DropdownMenu.Group>37<DropdownMenu.Item>38<button onClick={() => openUserProfile()}>Profile</button>39</DropdownMenu.Item>40<DropdownMenu.Item>41{/* Create a fictional link to /subscriptions */}42<Link href="/subscriptions">Subscription</Link>43</DropdownMenu.Item>44</DropdownMenu.Group>45<DropdownMenu.Separator />46<DropdownMenu.Item>47<button onClick={() => signOut(() => router.push("/"))}>48Sign Out{" "}49</button>50</DropdownMenu.Item>51</DropdownMenu.Content>52</DropdownMenu.Portal>53</DropdownMenu.Root>54);55};
The Last Step!
Your new component is almost ready — it just needs some styling. Let’s add a little bit to get started. The code below is ready to drop right into your app, and then you can import the new <UserButton /> into your header.
The Custom User Menu
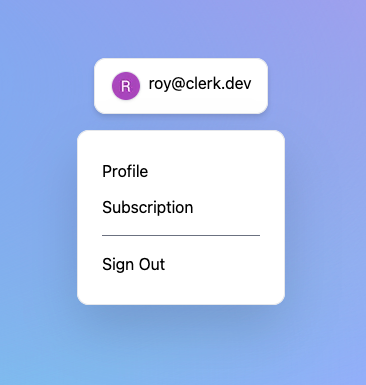
Final code
1"use client";23import * as DropdownMenu from "@radix-ui/react-dropdown-menu";4// Import useUser() and useClerk()5import { useUser, useClerk } from "@clerk/nextjs";6// Import Next's router7import { useRouter } from "next/navigation";8// Import the Image element9import Image from "next/image";10// Import Link to add more buttons to the menu11import Link from "next/link";1213export const UserButton = () => {14// Grab the `isLoaded` and `user` from useUser()15const { isLoaded, user } = useUser();16// Grab the signOut and openUserProfile methods17const { signOut, openUserProfile } = useClerk();18// Get access to Next's router19const router = useRouter();2021// Make sure that the useUser() hook has loaded22if (!isLoaded) return null;23// Make sure there is valid user data24if (!user?.id) return null;2526return (27<DropdownMenu.Root>28<DropdownMenu.Trigger>29{/* Render a button using the image and email from `user` */}30<button className="flex flex-row rounded-xl border border-gray-200 bg-white px-4 py-3 text-black drop-shadow-md">31<Image32alt={user?.primaryEmailAddress?.emailAddress!}33src={user?.imageUrl}34width={30}35height={30}36className="mr-2 rounded-full border border-gray-200 drop-shadow-sm"37/>38{user?.username39? user.username40: user?.primaryEmailAddress?.emailAddress!}41</button>42</DropdownMenu.Trigger>43<DropdownMenu.Portal>44<DropdownMenu.Content className="drop-shadow-2xl py-4 mt-4 w-52 rounded-xl border border-gray-200 bg-white px-6 text-black">45<DropdownMenu.Label />46<DropdownMenu.Group className="py-3">47<DropdownMenu.Item>48{/* Create a button with an onClick to open the User Profile modal */}49<button onClick={() => openUserProfile()} className="pb-3">50Profile51</button>52</DropdownMenu.Item>53<DropdownMenu.Item>54{/* Create a fictional link to /subscriptions */}55<Link href="/subscriptions" passHref className="py-3">56Subscription57</Link>58</DropdownMenu.Item>59</DropdownMenu.Group>60<DropdownMenu.Separator className="my-1 h-px bg-gray-500" />61<DropdownMenu.Item>62{/* Create a Sign Out button -- signOut() takes a call back where the user is redirected */}63<button64onClick={() => signOut(() => router.push("/"))}65className="py-3"66>67Sign Out{" "}68</button>69</DropdownMenu.Item>70</DropdownMenu.Content>71</DropdownMenu.Portal>72</DropdownMenu.Root>73);74};
call
Example repository: https://github.com/royanger/clerk-custom-user-menu
Explore the Powerful Customization Options Clerk Offers!
Take a look at our Custom Flows documentation to explore more ways to customize your application using the many hooks and methods Clerks provides.
For more in-depth technical inquiries or to engage with our community, feel free to join our Discord. Stay in the loop with the latest Clerk features, enhancements, and sneak peeks by following our Twitter/X account, @ClerkDev. Your journey to seamless user management starts here!


Start now,
no strings attached
Start completely free for up to 10,000 monthly active users and up to 100 monthly active orgs. No credit card required.
Pricing built forbusinesses of all sizes.
Learn more about our transparent per-user costs to estimate how much your company could save by implementing Clerk.
Newsletter!
The latest news and updates from Clerk, sent to your inbox.